How to Assign Applications to Specific Servers in XenApp 7
Tag Restrictions
In XenApp 7.12, we’ve added the ability to apply tag restrictions to machines. There are two different approaches how you can use this functionality in the current release — you can use it to assign application groups to specific machine(s) or you can use it to assign desktops to specific machine(s). In this blog post, I’m going to focus on application publishing.
Application publishing is based on a feature called Application Groups (AG), which was released in XenApp 7.9. If you’re not familiar with the content of App Groups, I recommend reading this blog post from Paul Morey. To quickly summarize, AG gives you more flexibility when you decide how you want to organize and publish your applications and allows you to publish application(s) to multiple Delivery Groups (DG). But while you could publish an application to all servers in one or more groups, it was not possible to publish application only to a subset of servers.
In XenApp 7.12, we’re extending this functionality by adding the ability to apply a tag filter to both AG and desktops. By combining these two features, you can now selectively assign applications and desktops to specific machines.
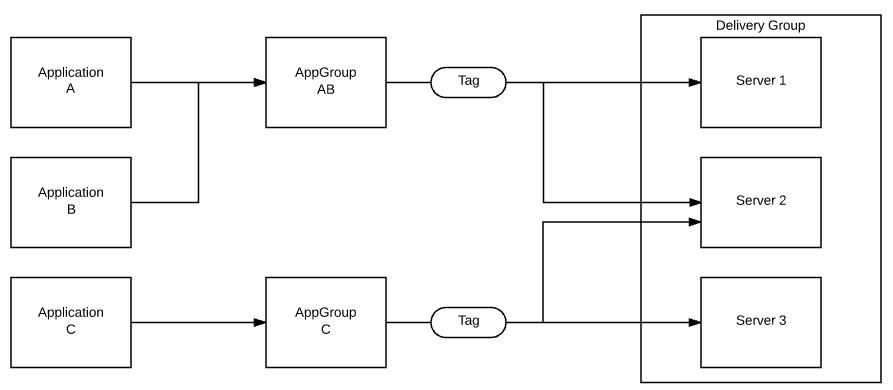
You can see the overview of this new functionality in the diagram below:

Fig 1: Example of selective publishing
To quickly summarize what you’re seeing in the diagram:
- Application(s) are assigned to App Group(s)
- App Group(s) are assigned to Delivery Group(s)
- Tag filter is applied to App Group
- Tag filter is applied to specific servers
Each AG supports only a single filtering tag to avoid a situation where complex publishing could slow down the enumeration process. However, servers can have multiple tags assigned. In the diagram, you’ll notice a server with multiple tags applied, while server 2 is used for all the applications. An important note and common misconception is that the AG is still linked to DG. You’re simply applying a tag filtering to this link.
There are different approaches now that you can take for your application publishing. I’ve summarized the most common one below.
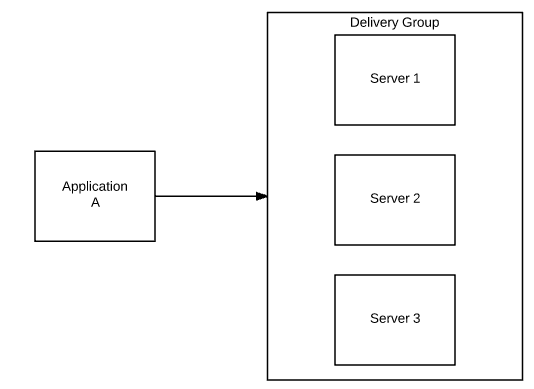
Approach A – Easy Going
This is probably still going to be the most common scenario. And it is very simple – no changes, this scenario is identical to how publishing has been always done in previous versions of XenApp 7. Both servers and applications are added to delivery groups and permissions are configured either on application or delivery group level. Very simple implementation that is ideal for majority of our deployments.

Fig 2: Simple application publishing
Approach B – Control Freak
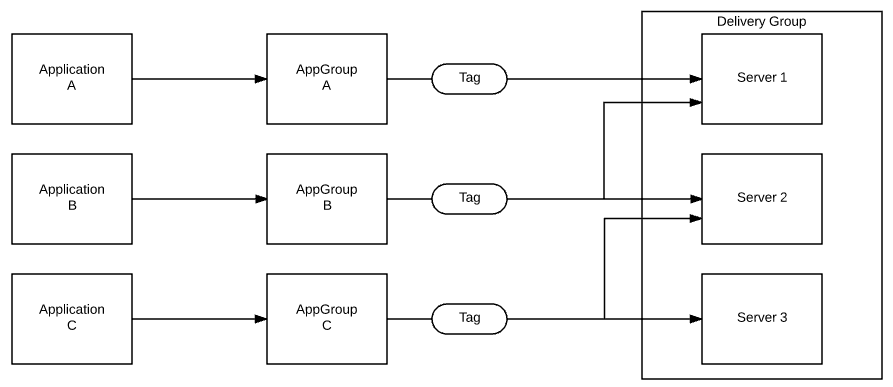
This is the scenario that we’re probably going to see in the lairs of old school Citrix administrators – yes, this is exactly how I’ve set up my lab at home. Each app group has exactly one application and one tag. Application tags are then manually assigned to all servers. This follows the old style of publishing applications in the previous versions of XenApp.
Unless you are like me and rely heavily on the automation, this scenario can be labor-intensive and it requires a lot of effort. It, however, gives you a lot of flexibility – you can assign applications to any combination of servers and easily remove them if needed. This is easily scriptable using the new Add-BrokerTag and New-BrokerTag cmdlets – leave a comment if you are interested in an example code.

Fig 3: Replicating XenApp 6.5 style of publishing
Approach C – Life in a Balance
This is the best of both worlds. Instead of strictly following one or the other publishing approach, you can combine both together. In this case, you’re still relying on a simple delivery groups to combine applications and servers together; however, for some special case you’re going to use tagging.
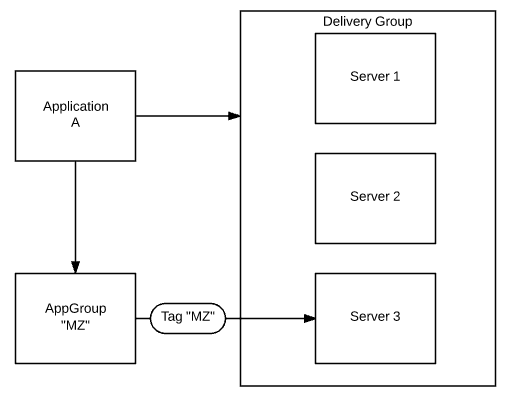
You can create an AG and a tag for each of the administrators (I’m using simple “MZ” in my environment). This tag can be then used for development, testing, troubleshooting and whatever the administrator needs to do. You will have both AG and tag pre-created and linked together, and simply reuse them in your environment for whatever is needed.
Let’s consider the following scenario – you want to make sure that when user X clicks on application A, his session will be launched on server 3, because this is where you’ve enabled detailed logging to troubleshoot his problem. What you will do in this case is the following:
- Add application A to app group “AG-MZ”
- Filter “AG-MZ” to be applied to “user X”
- Add tag “MZ” to server 3
In this case, you have application assigned to both AG and DG. In this configuration, AG will have a higher priority than DG. As you’re applying a user filter to AG, it will apply only to user X and the rest of the users are still going to connect directly to DG instead of using a filtered connection through AG.

Fig 4: Mixing simple and advanced publishing
After you are done with troubleshooting, you can use the same AG and tag for something else. For example, testing new applications or troubleshooting some other user.
How to implement this feature
Instead of writing a few pages of instructions, I’ve decided to create a short video where I’ll show you the implementation details of publishing.
Summary
- With tag filtering, you can assign applications and desktops to specific servers
- Application needs to be a member of App Group
- App Group needs to be assigned to Delivery Group
- Tag is applied to App Group. AG can have only a single tag filter.
- Tag is applied to server within a Delivery Group. Server can have multiple tags.


