Featured post

Automation | Powershell scripts

Automation | Powershell scripts Xenapp 6.5 Health check script XenAppServerHealthCheck Report through Script  ## XenAppServerHealthCheck ## ...

Tuesday, 4 December 2018

Print Spooler Keeps stopping Automatically

Print Spooler Keeps stopping Automatically

In Windows XP, Windows Vista, Windows 7, Windows 8

Question

When I try to print I got an error message “The print spooler service is not running” and then I am going to start it, print spooler service crashing windows 7 automatically, Doesn’t stay on,  on it started successfully and then again I gives a print command to printer it’s again shown me the same message, then I checked the “print spooler” service it is again stopped automatically.

Solved Answer

This post will guide you how to solve this problem “Print Spooler service keeps Stopping Automatically”, actually there are many reasons behind that, The main reason is the driver conflicting (Please update the printer drivers), however we explained everything in this post, please follow the following steps  to get rid of this problem “Print Spooler keeps Stopping Automatically”. If you followed all the above steps properly, I am sure about it the problem cannot persist anymore. Print spooler service stopping automatically, print spooler service is automatically stopping, spooler stop, print spooler stops suddenly, print spooler stopped can’t install the printer.

Steps

1. Open Services page
  • (For windows xp) Click on Start and then click on RUN then Type Services.msc in RUN box then hit enter
  • (For windows 7, 8, Vista) Click on Start and then Type Services.msc in Search  box then hit enter
2. Find “Print spooler” Service and then Double click on it.
2. You will see a “Stop” button, Stop the Service for a while.
3. Go to “Recovery Tab”
4. (Important Step) Change “First Failure” & “Second Failure” Value under “Recovery Tab”
  • Change the value of  “First Failure” to “Restart the Service”
  • Change the value of  “Second Failure” to “Restart the Service”
5. Make sure  the RPC Service is the dependencies of the “print spooler”
6. Then Leave it until next step is complete
7. Delete all the print job from this path “c:\windows\system32\spool\PRINTERS”

  • Delete all the files under this following path (make it clean)
  • c:\windows\system32\spool\PRINTERS
  • c:\windows\system32\spool\PRINTER

8. Now Start the print Spooler Service.

Come again “print spooler” Configuration page and click on “Start” Button.

Restart your computer

If the problem still persists then you must try these more Additional Advanced Steps

9. (Important Step) Run a command “SFC /scannow” in Command prompt (with Administrative Right)
SFC /scannow

10 (Important Step) Run one more command “chkdsk /f /r” in Command prompt (with Administrative Right)
chkdsk /f /r

11. (Important Step) Delete all unwanted printers from the computer.

12. (Important Step) Make sure all printers are installed with correct drivers “there is not driver conflicting”(Please reinstall printer drivers again)

Step 13: Get the “.dll” file name & path which one is making conflicting spooler service.

  • Right click on MyComputer and then click on  Manage. You’ll get another window.
  • Click on the arrow of the “Event Viewer” (to Expand it).
  • Click on the arrow of the  “Windows Logs” (to Expand it).
  • Click on “Application” under Windows Logs.
  • Now look on the right side pane, there have listed all the system LOGS.
  • Now scroll down/up to find the error (Red Cross Error) which is related to print spooler service. Once you get it, double-click on it to get more details about the error (These logs create when system get any error or problem, so please find the error, that time you get crashed your printer spooler service.)
  • Now you have the exact error message details. Here, find the name & path of “.dll” file in this detail.
  • Now you have the particular “.dll” file name & path which one is doing conflicting with print spooler service.
  • So, stop the conflicting via repair, rename that “.dll” file.
    Do appropriate action on that file using following method below.1. If found “.dll” file is related to printer drivers then you can rename & delete the file, and then reboot your computer and then you can easily reinstall your printer driver.2. If found “.dll” file is related to any 3rd party application then you can uninstall that application and install it again if you want to use that application. You also can rename & delete the file if it is not related to windows system files anyhow. After that reboot, your computer once.3. If found “.dll” file is related to windows system files or location then you must not rename & delete the file, because of it may be harmful for your operating system itself. To fix this issue you have to repair your windows through “SFC /scannow” or “chkdsk” or Combo Fix tool (Comobofix is a third party tool (Free Tool) however it can fix most of the windows issues). After that reboot your computer once.
    SFC /scannow
    chkdsk
    • SFC /scannow
    • chkdsk
    SFC /scannow
    chkdsk

We are much sure about that this problem can not persist any more If you followed all the above steps properly.

Windows could not start the World wide web publishing service Error 1068

Windows could not start the World wide web publishing service Error 1068


Solution:
Open RegEdit
And move to HKEY_LOCAL_MACHINE\SYSTEM\CurrentControlSet\services\WAS\Parameters
Check the ‘ConfigIsolationPath’ and make sure the path is present and it has proper rights.
Now open services.msc and try starting the service. It should work.

For me, I didn’t have ConfigIsolation Path in my registry, but the Windows Process Activation Service was looking for c:\inetpub\temp\apppools\, which I did not have. Creating this folder got things going again. This article was very helpful in tracking down the problem, “Windows Process Activation Service (WAS) Is Stopping Because It Encountered An Error”.

NOTE:- Path  c:\inetpub\temp\apppools and HKEY_LOCAL_MACHINE\SYSTEM\CurrentControlSet\services\WAS\Parameters
Check the ‘ConfigIsolationPath’ should be same .

How to Disable and Delete User Profiles or Temporary profile issue


How to Disable and Delete User Profiles or Temporary profile issue


Introduction

DISCLAIMER: Editing\Deleting registry keys is very dangerous and should always be done with caution. Before making any changes to the registry please create backups and move them off the server from which you will be making registry changes.

Steps (11 total)

1

Identify the SID of the user whose profile needs to be deleted.

– I typically use ADSI Edit on a domain controller to do this. Open ADSI Edit, navigate through the OU’s until you find the user, CN=”Username”, right-click and choose properties. Scroll to the object property labeled “objectSid”. Document that SID because you will need it shortly.
2

Verify that the user is not logged into the server.

– From a command prompt type “query user” and verify that the user is not listed.
3

Open the folder directory where the server user profiles are stored.

– Server 2008 default is “C:\%USERNAME”.
4

Delete the profile folder for the user.

5

Open the registry editor.

– Start > regedit
6
Navigate to the following: HKEY_LOCAL_MACHINE\SOFTWARE\Microsoft\Windows NT\CurrentVersion\ProfileList

7
Locate the sub-key that is named the same as the documented SID from earlier. Right-click on the sub-key choose delete.
8
Have the user log back in. If the user reports no problems then you have successfully deleted a user profile.
– If the user logs in and is presented with a pop-up from the system try stating that the user is being logged in with a temporary profile then proceed to step 9.
9
If the user gets logged in with a temporary profile then have them log out, open up the registry editor once again, and navigate to HKEY_LOCAL_MACHINE\SOFTWARE\Microsoft\Windows NT\CurrentVersion\ProfileList.
10
Look for a sub-key named the same as the documented SID followed by a “.bak”. Right-click on that sub-key and choose delete.
11
Have the user attempt to login. The user should no longer be prompted by the temporary profile pop-up.

Enable Legacy Client Drive Mapping Format on XenApp


Enable Legacy Client Drive Mapping Format on XenApp


Objective
With XenApp 6.x and later, Citrix changed the format on how to display mapped client drives. In earlier releases, drives where mapped to a physical letter. With this release, a redirection similar to Terminal Services is implemented, that displays the drive as a local disk and the source device it is mapped from. Client drives therefore appear as “Local Disk” as in the following screen shot:
User-added image
There are instances that require an administrator to enable legacy client drive mapping in XenApp so that unique drive letters are used to map client drives:
User-added image

Instructions
To enable legacy client drive mapping on XenApp, the following registry key must be set on the server:
Caution! Refer to the Disclaimer at the end of this article before using Registry Editor.
Create this registry key if it does not exist:
HKEY_LOCAL_MACHINE\Software\Citrix\UncLinks\
Under the key, create a DWORD: UNCEnabled.
Set the value of UNCEnabled to “0”.


Additional Resources
CTX126763 – Client Drive is Not Mapped Using ICA Client Version 12 as Pass-Through Client
Disclaimer
Caution! Using Registry Editor incorrectly can cause serious problems that might require you to reinstall your operating system. Citrix cannot guarantee that problems resulting from the incorrect use of Registry Editor can be solved. Use Registry Editor at your own risk. Be sure to back up the registry before you edit it.
Applicable Products
XenApp 6.5 for Windows Server 2008 R2
XenApp 6.0 for Windows Server 2008 R2
XenApp 7.5
XenApp 7.6

Remove a server or application via DsCheck.exe


Remove a server or application via DsCheck.exe


In our case a server whose registration was corrupted.
The only way (accessible) can check the status of your DataStore is the use of DsCheck.exe (dscheck command allows you to validate the consistency of the DataStore and can repair inconsistencies found).
A prior backup of the DataStore is recommended

Commands to delete an application in the DatasStore:
dscheck / full Apps "App Name" / deleteMF / SILENT
dscheck / full Apps "App Name" / deleteComApp / SILENT
Commands to remove a server in the DatasStore:
dscheck / full servers "Server HostName" / deleteMF / SILENT
dscheck / full servers "Server HostName" / deleteComApp / SILENT
The / DeleteMF deletes the entry of the record in the DataStore
The / DeleteComApp removes the common input in the DataStore.
If you want more information on DsCheck.exe:
CTX124406 (XenApp 4.5 / 5 for Windows 2003 32/64 Bits)
CTX107800 (Presentation Server 3.0/4.0 for Windows 2000/2003)

How can you find out which Microsoft Patches are installed on the PC?

How can you find out which Microsoft Patches are installed on the PC?

Microsoft provides the option by means of WMI for determining which patches are installed.
What is WMI/WMIC?WMI is the abbreviation for “Windows Management Instrumentation”.
WMIC (Windows Management Instrumentation Command Line) extends WMI for operation by way of multiple command line interfaces and batch processing script files.
More information about WMI is available from Microsoft on the internet at
http://technet.microsoft.com/en-us/library/bb742610.aspx (English)
Procedure
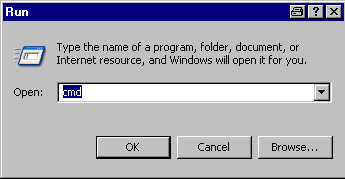
  1. In the Windows Start menu you select the “Run…” menu item and enter the command “cmd”. 

    Fig. 01
  2. In the DOS command window that opens you enter the command below:
    wmic qfe list full /format:htable >C:\Temp\hotfixes.htm

    Fig. 02
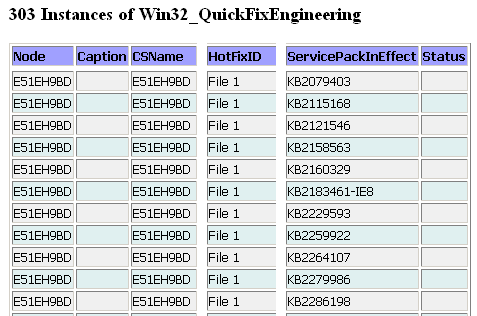
    This command creates an HTM list with the installed patches of Microsoft Windows.
  3. Go to the path specified (here C:\Temp) and find the file Hotfixes.htm.
    This file contains a list of all the Microsoft Windows patches installed on the SIMATIC PC.

    Fig. 03
  4. In this list you can find the patches required using the Search command.

    Fig. 04
Further information
It is also possible to use Microsoft MBSA (Microsoft Baseline Security Analyzer).
http://technet.microsoft.com/en-us/security/cc184924 (English)
http://technet.microsoft.com/de-de/security/cc184924 (German)

Friday, 23 November 2018

IMA to FMA


XenApp 6.5 has reached end of maintenance and with the end of life date only a few months away, migrating your existing 6.5 environment(s) to XenApp & XenDesktop 7 is highly recommended.

This also means moving from the IMA architecture to FMA. In earlier 7.x versions, some 6.5/IMA features were not available, but rest assured, they were added throughout new releases. Because some features have been rebranded or have gone through some design changes and improvements, this blog article may assist you in finding the XenApp 6.5 feature you are looking for in XenApp & XenDesktop 7.
Below you can find a summary of all important XenApp 6.5 features and how they translate to the feature set of XenApp & XenDesktop 7.
 FILLER TEXTXenApp 6.5XenApp/Xendesktop 7.xAdded in version
ArchitectureIMA – MeshFMA – Brokers + Workersn/a
Centralised configurationDatastoreSite Databasen/a
DB resilienceLocal Host Cache (LHC)Connection leasing – LHCLHC added in 7.12
Load balancingLoad evaluatorsLoad balancing policies n/a
ScalingZonesZones and zone preference7.7, zone preference: 7.11
Managing workersWorker GroupsDelivery Groups, Application groups and Tags7.9 (AG’s) – 7.12 (tags)
Restarting workersScheduled server reboot policyRestart schedulesImproved in 7.12
Application streamingOffline appsImproved App-V support and integrationImprovements in 7.8 and 7.11
App and Desktop Session SharingDefault behaviourReintroduced in 7.17 as default behavior7.17
AuthenticationWeb interface: per site auth configStorefront: per store auth configSF 3.5
ProvisioningProvisioning services (PVS)PVS, MCS, App Layeringn/a
MonitoringEdgeSightDirectorn/a

Architecture

The Independent Management Architecture (IMA) used by XenApp 6.5 and earlier versions is a mesh architecture. The Flexcast Management Architecture (FMA) used by XA/XD 7.x on the other hand consolidates all brokering functionalities to the Desktop Delivery Controller (DDC). Applications and desktops are hosted on separate machines, the workers, where the Virtual Delivery Agent (VDA) is installed.
This means that the DDC will consolidate following backend roles found in the IMA architecture:
  • Load management, replacing the Zone Data Collector (ZDC)
  • Communication with WebInterface/Storefront (XML service)
  • User and worker management
  • Configuration and policy management (direct connection with the site database)
  • Secure Ticket Authority: for secured external connections

Centralised configuration

Both the IMA Datastore and the Site Database allow centralized storage of the configuration data. XA/XD 7.x also supports a Configuration Logging Database.

Database resilience

XenApp 6.5 and earlier offered protection from datastore failure by using a Local Host Cache (LHC). Every XenApp server saved a copy of the datastore database in a locally stored MDB-file.
Prior to XenApp/XenDesktop 7.12, in addition to database mirroring, the Connection Leasing feature would offer a backup solution in case of site database failure. In short, it creates XML files containing user, client and resource information, locally stored and synchronized between DDC’s. In case the controller receives a connection request from Storefront and it detects an unavailable database, it would try to find the connection information for that user/resource in the XML files.
Connection leasing has quite some limitations during an outage of the DB:
  • No connections possible to pooled VDI’s, users who have not been assigned a desktop are unable to log in.
  • Users with leases not yet synchronized before the DB outage will be unable to connect.
  • Session limits are not applied.
  • No power management. Assigned desktops that are turned off will not start, risking a shortage of available desktops.
  • No load management.
To deal with these limitations, XenApp/XenDesktop 7.12 not only reintroduced, but also improved the LHC.
Many Citrix administrators will be familiar with the command dsmaint recreatelhc, rebuilding a corrupt LHC. XA6.5 and earlier uses an MDB-file to store a local copy of the datastore which is prone to corruption.
The new LHC uses a more robust technology: LocalDB. This is actually a stripped down SQL Server Express instance designed to temporarily store data from an application or process. This data is only accessible locally and will be deleted when the service is restarted, making the LHC more secure and reliable. The new LHC will only be used in case of DB failure.

Load balancing

The DDC replaces the Zone Data Collector and will collect and manage the load of workers and will decide where a session will be launched. Load evaluators are replaced by Load management policies.
Zoneszone preference and Application Groups offer additional techniques to ensure your users connect to their application or desktop in the most efficient way.

Scaling

The IMA architecture allowed XenApp servers to be assigned to zones in order to group servers in the same geographical location, avoiding unneeded WAN traversing.
XenApp/XenDesktop 7.7 reintroduced zoning by allowing administrators to assign DDC’s, host connections and machine catalogues to a zone. Version 7.11 extended the functionality of zones greatly by adding zone preferences:
  • Location zoning: connect to a resource depending on the user’s location (Configured using Netscaler Gateway and Storefront)
  • User zoning: launch the application or desktop on a machine closest to where the user’s data is located
  • Application zoning: launch the application or desktop on a machine closest to where the application’s data is located
  • Further reading

Managing workers

XenApp 6.5 uses Worker Groups  to group XenApp servers together, streamlining application publishing, load balancing and policy assignment.
XenApp/XenDesktop 7.x uses Delivery Groups, containing one or more machine catalogues, for desktop and application assignment.
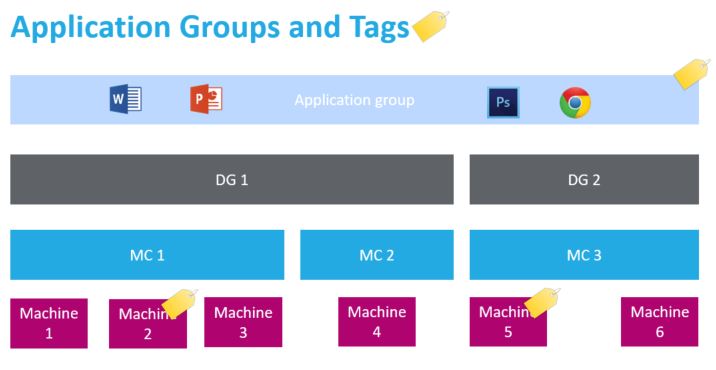
XenApp/XenDesktop 7.9 added an additional management layer: Application Groups. They can span multiple DG’s and support DG priorities and user assignment.
In order to give administrators even more granular control, XenApp/XenDesktop 7.12added tags that can be assigned to individual machines, restricting application or desktop launch on workers with a specific tag assigned.

Restarting workers

Scheduled automated reboots of a XenApp 6.5 server is configurable through a policy.
In XenApp/XenDesktop 7restart schedules can be configured through the propertiesof a Delivery Group.
Release 7.12 adds a lot more granular configuration by introducing the Restart Schedules v2 . Configurable through Powershell, it allows administrators to configure multiple schedules per DG and, using tags, it is now possible to create a schedule for a subset of a delivery group.

Application streaming

Offline applications are no longer available in XA/XD 7. However, it offers better support and integration with Microsoft App-V. Citrix Studio allows you to connect with the App-V management console (dual management). Version 7.8 allows for placing App-V packages on a network share, removing the dependency on the App-V server (single management). 7.11 added support for isolation groups.

Web Interface Authentication configuration per site

Storefront has replaced the functionality of the Web Interface. At first, authenticationwas a global Storefront setting while you could define the authentication method per site using Web Interface. From Storefront 3.5, the possibility to configure authentication per store has been reintroduced.

Session sharing between a published desktop and application

This default behavior changed in XA/XD 7: when starting a published application withinpublished desktop (ICA in ICA), a new session for that application is always started, even if the application is available locally and published on the same Delivery Group.
Workarounds are available to change this behavior. 7.17 introduced a feature that not only enables the desktop-application session sharing again , it also gives you controlover the preferred launch method on a per application basis.

Provisioning

Provisioning machines using PVS remains fully supported in XA/XD 7. Additionally, the Machine Creation Services (MCS) provisioning method is offered, now also supporting cache to RAM with fallback to disk . Platinum customers can also use App Layering to easily create and manage images and to dynamically assign application layers to users and machines (elastic layering).

Monitoring

Citrix EdgeSight offered detailed monitoring and troubleshooting tools for your XenApp farm. EdgeSight is a separate component and required an agent to be installed on the XenApp server.
In a XenApp/XenDesktop 7 environment, Citrix Director will take care of the performance data collection and monitoring of your environment and will provide you with the troubleshoot tools to quickly identify issues. No additional agents or components are required as monitoring data will be stored by default in the monitoring database.
Director has received many new features since it was introduced:
  • Proactive monitoring and alerting
  • SCOM integration
  • Custom reporting
  • SNMP support
  • Application Analytics
  • Disk and GPU monitoring
  • Integration of HDX monitor
  • Extended retention of data

Still in need for more data? No problem.

Using a Citrix policy, you can enable process monitoring on the workers you specify. CPUand memory data for each running process in the VDA will be saved in the monitoring database. Make sure to scale your database appropriately for the extra data.
If you are still missing a report or view from EdgeSight, you should consider looking into the custom reports of Director. It supports the Open Data Protocol (OData), giving you access to a wealth of information without having to write complicated SQL queries. You will be surprised how easy you can get very detailed data and create custom reports using the OData connector of MS Excel.

And a lot more extra features are waiting for you…

If you haven’t yet taken the step yet to upgrade your 6.5 environment, I hope this article has reassured you that you won’t have to miss any of the functionalities when moving to FMA. As a bonus, you will get dozens of new features and optimizations that were added since XenApp/XenDesktop 7 was released and added support for a wider range of operating systems and technologies.